
Building a SQL environment inventory with the MAP Toolkit
The MAP Toolkit, also called the Microsoft Assessment and Planning Toolkit, is a standard way to obtain information about your Microsoft environment. This includes your SQL Server. The tool is so common that a link to it is included in the SQL Server media. This tool will scan your network and provide a fairly comprehensive report on SQL Servers it finds. The direct link to the MAP Toolkit download is located here. Be sure to download all the files from that page.

MAP Toolkit Link In SQL Server Installer
As a DBA new on the job, the MAP Toolkit can be a lifesaver. You have no idea how many SQL Servers there are or what versions and editions exist, or where they are installed. Sure, you asked these questions during the interview, but unless you were talking to a DBA team who has been there awhile, you likely didn’t get correct answers. You see, most places don’t really know how many SQL Servers they have. I’ll be your guide to getting that first SQL Server environment inventory up and running so you know what you’ve inherited.
Why Use the MAP Toolkit?
First, using this MAP Toolkit will automate the process of gathering important SQL Server environment information for data professionals. Even if you only have a a few SQL Servers, using this tool will save you time versus manually connecting to each SQL instance to get the same data.
Second, there are almost always more SQL Servers in an environment than people realize and this application will locate them for you.
Third, the MAP Toolkit will help you find computers where Standard or Enterprise Edition is installed other than production. You have to have licensing for Standard or Enterprise edition when installed on people’s laptops or PCs. I’ve found plenty of employee computers running Enterprise edition SQL Server! Also, non-prod servers should not have Standard or Enterprise edition installed for the same reason. In non-prod, use Developer edition, as it’s free.
Getting Started with the MAP Toolkit
A full tutorial on using the MAP Toolkit is available here on Microsoft Learn. MAP Toolkit installation is fairly straight forward but is also included in the tutorial from Microsoft that I linked to above. You can install it on your own desktop and then scan Active Directory for SQL Servers. Please be sure to notify your System Administrators BEFORE you run the scan as it will set off intrusion detection alarms.
Here is a screen capture of what some of the inventory methods are.
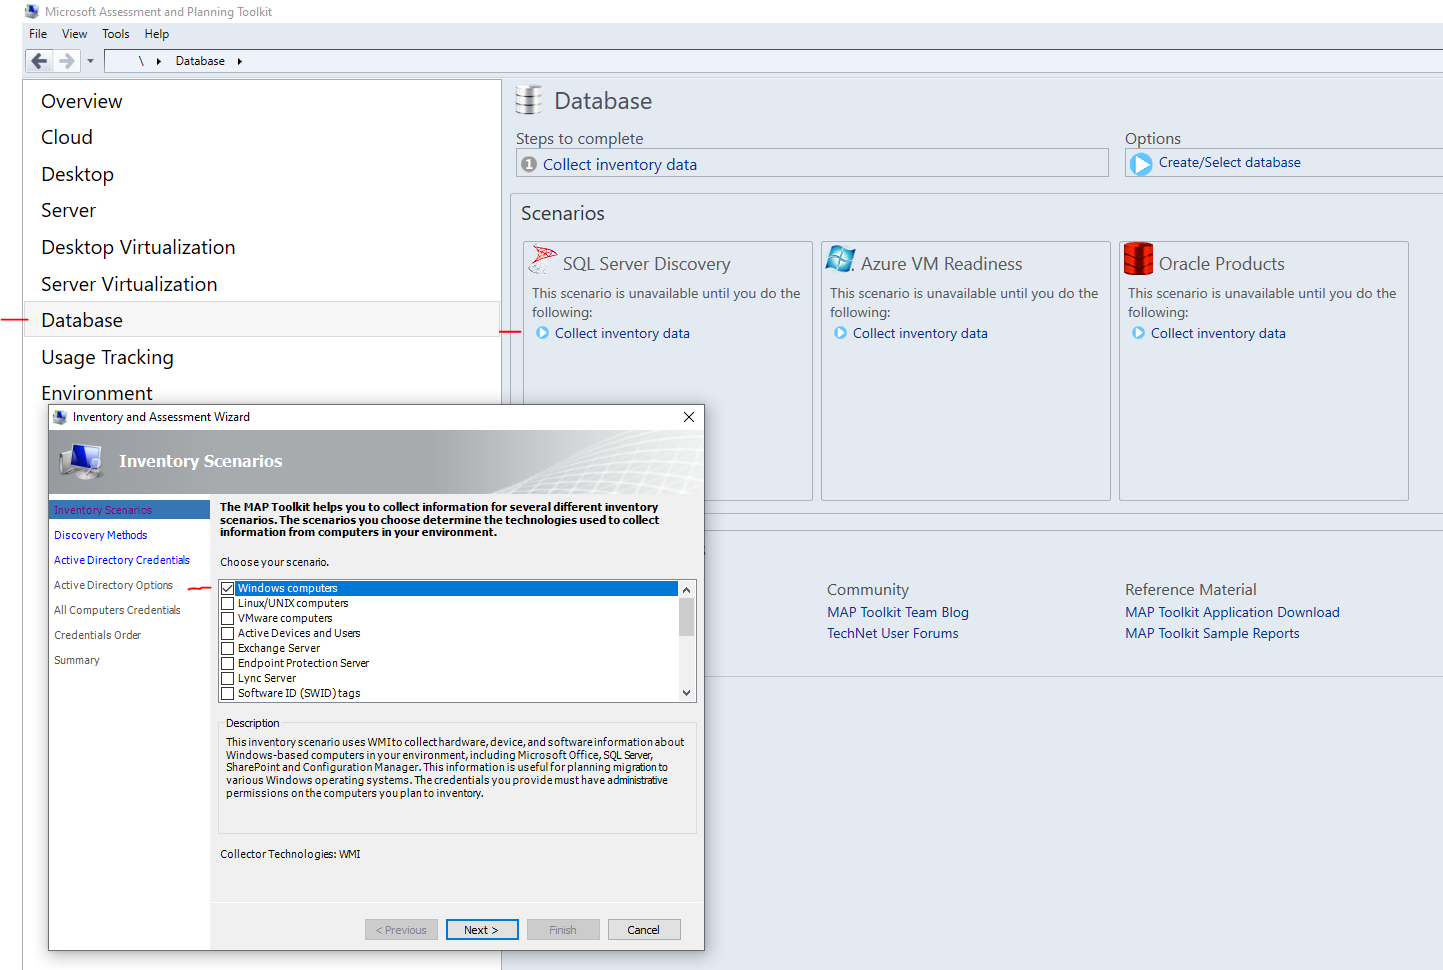
MAP Toolkit – Scan options
Generating Excel Reports from the MAP Toolkit
Once SQL Server scan is complete, you will see a screen like this one.
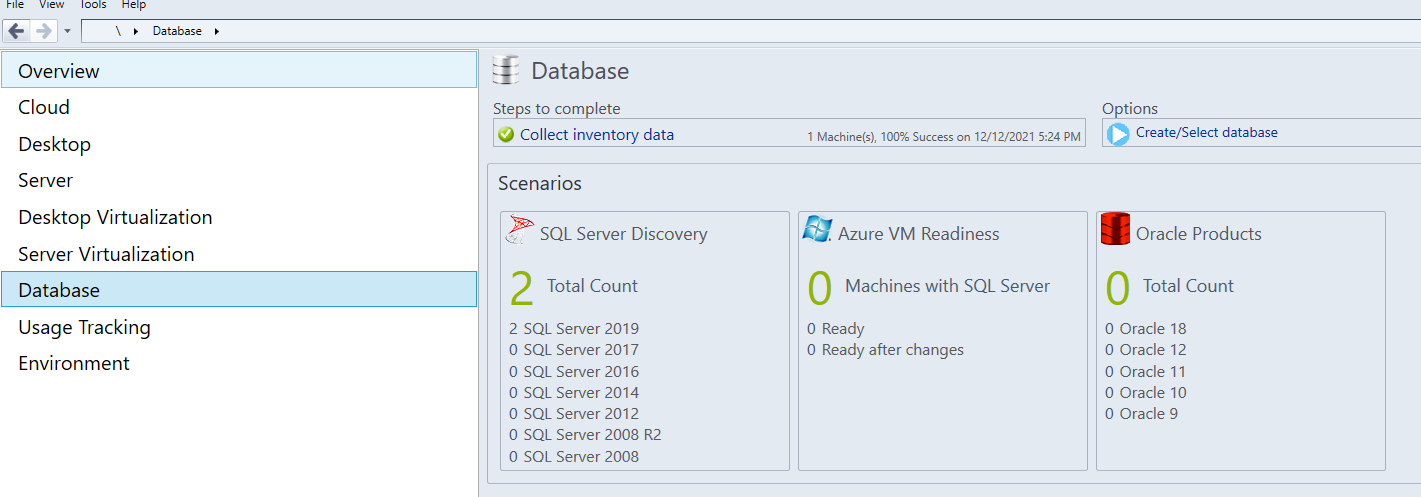
MAP Toolkit – Post Collection Screen
Click anywhere in the box under “SQL Server Discovery”, then you will see a screen like this. Click each excel icon in the Options section to generate the Excel for what was captured.

MAP Toolkit – Generate Excel Output
The SqlServerAssessment file will have the list of the SQL Server instances it found, the computers those instances are on the product version name, Service Pack number and edition. The data will also contain the OS version of the computer and some general hardware information. Importing at least these columns into a SQL Server database using the Import/Export Wizard in SQL Server is your first step to understand what your SQL Server environment looks like.
If you want to see what the assessment files might look like before you run your first scan, be sure to extract the file “MAPSample_Documents.zip” and locate the SQL Server samples. These will give you an idea of the kinds of information you can expect from the tool.
Why Import This Data to a SQL Server?
Importing this data to SQL Server affords you at least four advantages to keeping it just in an Excel file.
- The data recovery abilities of a SQL Server database are superior as opposed to trying to recover a file that has been deleted, which is not always possible.
- The data is accessible to other data professionals who have proper permissions on the SQL Server. This makes it easy for other people on the data team to review, analyze and maintain the data.
- Having the data in a database also allows you to query the data for a variety of things, like how many of each product name(SQL Server 2005, 2008…2017, 2019), that you have.
- As you maintain this data over time. You can see how the environment changes as you upgrade older SQL Server products to newer ones, for example. This can be great information to have when it comes to updating your resume or when approaching review time.
There is certainly other useful information in the various tabs of both spreadsheets created by the reports. I strongly encourage you to explore that data to learn what you can about your SQL Server environment.
Next Steps To Take
- Now that you seen what the MAP Toolkit can do for you, download and run your first scan. Then import it into SQL Server. You’ll likely be surprised at what it turns up.
- Analyze the scan results to see how many SQL Servers you need to
dumpupgrade to get onto a supported version of SQL Server. Upgrading to a modern version of SQL Server can be a key goal for you as a DBA. - If you have questions or comments, leave me a comment on this post, or message me on Twitter
[…] talked about in other posts is how to create a SQL Server inventory. I’ve discussed using the MAP Toolkit and building your own inventory database using T-SQL. Today, we’ll see another way to […]
[…] so you know what you’re responsible for managing. As your guide, I discussed in a previous post, how to get started with using the MAP Toolkit from Microsoft to get a list of SQL Servers in your […]
[…] Lee Markum goes to active sonar: […]