
How to Configure SQL Server Temporal Tables
Temporal tables were a new feature in SQL Server 2016. They allow for the tracking of changes without having to set up change tracking, change data capture or triggers. For certain uses, they are not a replacement for something like change data capture, but would work if the purpose is simply having a record of changes. Temporal tables can also be used for auditing changes to data as well as point-in-time analysis where users might want to compare data changes over time, or even at a specific point in time.
You can create a new table as a temporal table from the very beginning. However, I think a more common scenario is going to be converting existing tables to be temporal tables so I will start there.
The Initial setup
I’ll make a backup of the Production.Products table. I do this as a general practice to keep from having to restore the database to return things to normal after demos and experimentation. This way, I can drop the backup of the table and move on.
USE AdventureWorks2016CTP3;
GO

DROP TABLE IF EXISTS Production.ProductBackup
SELECT TOP (1000) [ProductID]
      ,[Name]
      ,[ProductNumber]
      ,[MakeFlag]
      ,[FinishedGoodsFlag]
      ,[Color]
      ,[SafetyStockLevel]
      ,[ReorderPoint]
      ,[StandardCost]
      ,[ListPrice]
      ,[Size]
      ,[SizeUnitMeasureCode]
      ,[WeightUnitMeasureCode]
      ,[Weight]
      ,[DaysToManufacture]
      ,[ProductLine]
      ,[Class]
      ,[Style]
      ,[ProductSubcategoryID]
      ,[ProductModelID]
      ,[SellStartDate]
      ,[SellEndDate]
      ,[DiscontinuedDate]
      ,[rowguid]
      ,[ModifiedDate]
   INTO Production.ProductBackup
  FROM [AdventureWorks2016CTP3].[Production].[Product];

ALTER TABLE Production.ProductBackup ADD CONSTRAINT PK_PreoductBackup PRIMARY KEY CLUSTERED (ProductId);
Now that we have a our table that we want to convert to a temporal table, let’s suppose that AdventureWorks wants to raise the price of all products in the Accessories product sub-category. The below will get that initial data and confirm that our expression is right prior to updating the actual data. It also will provide us with the knowledge of how many rows we should expect to see changed.
SELECT P.[Name] AS ProductName, P.ProductNumber, P.ListPrice, CAST(P.ListPrice *1.10 AS DECIMAL(9,2)) AS NewListPrice ,PC.[Name] AS ProductCategoryName, PSC.[Name] AS ProductSubCategoryName
FROM Production.ProductBackup AS P
INNER JOIN Production.ProductSubcategory AS PSC ON P.ProductSubcategoryID = PSC.ProductSubcategoryID
INNER JOIN Production.ProductCategory AS PC ON PC.ProductCategoryID = PSC.ProductCategoryID

WHERE PC.[name] = 'Accessories'
ORDER BY ProductCategoryName, ProductSubCategoryName
Here is a partial screenshot of the results. Twenty-nine rows were returned.
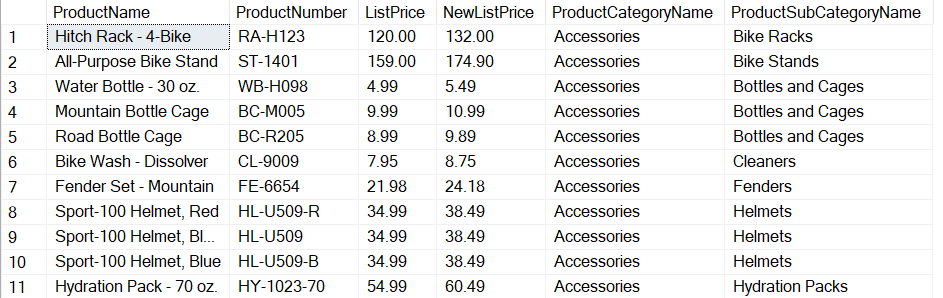
Price increase for Accessories product subcategory
A sometimes recommended practice for temporal tables is to create a separate schema to hold the history table, so we’re going to do that.
/*
Create a new schema to hold the history table
*/
CREATE SCHEMA History;
Enabling Temporal Tables In SQL Server
Now we will set up system-versioning for our existing table. Two new columns need to be added to the source or “temporal table.” These must be specified as DATETIME2 and can either be hidden or not. If the keyword HIDDEN is used, then these two columns do not show up at all when this table is queried. You might not want the columns to appear in query results because you might be running SELECT * against the table, even though you know not to do that in a production system, right? Also, if the columns are added as HIDDEN, then you don’t have to account for these columns when you do INSERTs.
Once the table has been altered as needed with the new columns, and we’ve either done what I did here and specify defaults for those columns or explicitly defined them and NOT NULL. We also need to add the PERIOD FOR SYSTEM_TIME statement. After that, there is one additional ALTER TABLE statement to turn on system versioning.
/*
Enable SystemVersioning on existing table
*/

ALTER TABLE [Production].[ProductBackup]
  ADD SysStartTime DATETIME2 GENERATED ALWAYS AS ROW START HIDDEN
         CONSTRAINT DF_SysStart DEFAULT SYSUTCDATETIME()
      , SysEndTime DATETIME2 GENERATED ALWAYS AS ROW END HIDDEN
            CONSTRAINT DF_SysEnd DEFAULT CONVERT(DATETIME2, '9999-12-31 23:59:59.9999999'),
        PERIOD FOR SYSTEM_TIME (SysStartTime, SysEndTime);

ALTER TABLE [Production].[ProductBackup]
SET (SYSTEM_VERSIONING = ON(HISTORY_TABLE = History.ProductBackup));
What Happens When You Modify Data In a Temporal Table?
Let’s update some rows to populate the history table.
/*
Update some rows to populate the history table.
We will raise the price of everything in the Accessories category by 10%.
Should be 29 rows changed.
*/

BEGIN TRAN
  UPDATE Production.ProductBackup
  SET ListPrice = CAST(ListPrice *1.10 AS DECIMAL(9,2))
  FROM Production.ProductBackup AS P
  INNER JOIN Production.ProductSubcategory AS PSC ON P.ProductSubcategoryID = PSC.ProductSubcategoryID
  INNER JOIN Production.ProductCategory AS PC ON PC.ProductCategoryID = PSC.ProductCategoryID
  WHERE PC.[name] = 'Accessories';

COMMIT TRAN
Let’s examine one method to see the current price in the source table and the previous price from the rows now in the history table. This will also show the system start and end times for those rows. This date/time range shows when this rows was valid and present in the source table.
/*

One method to show the old data and the new data
*/
SELECT PB.[Name] AS PBName, PB.ListPrice AS CurrentListPRice,
PBH.ListPrice AS PreviousListPrice, PBH.SysStartTime, PBH.SysendTime
FROM Production.ProductBackup AS PB
INNER JOIN History.ProductBackup AS PBH ON PB.ProductID = PBH.ProductId --AS PB
--FOR SYSTEM_TIME ALL
WHERE PBH.ProductID IN
(
/*These were the 29 IDs I knew we had changed because we returned them in the previous SELECT query
*/
707,708,711,842,843,844,845,846,847,848,870,
871,872,873,876,877,878,879,880,921,922,923,
928,929,930,931,932,933,934
)
ORDER BY PBH.ProductID;
Here is a partial screenshot of the results. This table indicates that these rows existed in the source table between August 24th at 04:01:00 and August 24th at 04:01:29.
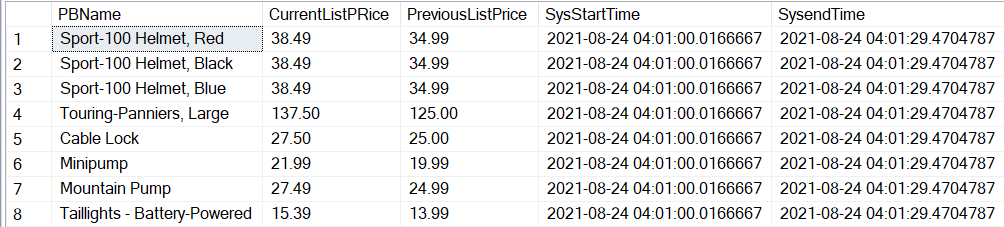
A view of SQL Server temporal table history
Data Retention for SQL Server Temporal Tables
One additional thing to consider when setting up temporal tables is data retention for the history table. There are several methods to manage data retention, but I think the simplest is to set a retention policy on the table itself and let SQL Server handle the data cleanup. By default the history table will store data indefinitely.
First, check to see that data retention is enabled in the database by querying the column is_temporal_history_retention_enabled column in sys.databases. If it is not enabled, then use the below to do that, remembering to set the database context for your environment within the script.
ALTER DATABASE [<myDB>]
SET TEMPORAL_HISTORY_RETENTION ON
To alter an existing temporal table so that history retention is being managed you can do the below. Keep in mind that values with DAYS, WEEKS, MONTHS, and YEARS are all valid for history table retention.
ALTER TABLE Production.ProductBackup
SET (SYSTEM_VERSIONING = ON (HISTORY_RETENTION_PERIOD = 9 MONTHS));
Next Steps to Take
- Head over to the MS Docs to learn more about temporal tables in SQL Server.
- If you need to know WHO made a change as well as what was changed then check out this post from Aaron Bertrand.
- Look for subsequent posts from me that will cover more about temporal tables.
- If you would like help with anything in this post, or with something else related to SQL Server, reach out to me here, or on Twitter, and I’ll be glad to offer assistance.
[…] the initial post, we talked about some very basic items to get you up and running with temporal tables. In part 2, […]