November 1, 2026
In part 1 I described laying the foundation for the lab. This post will describe building the Windows domain controller and other machines on my Linux Mint host.
My goal was to have a realistic, production-like configuration. As a result, I wanted a domain controller, two SQL Servers in a Windows cluster and an Availability Group.
Looking back through the ChatGpt thread, I apparently started cloning the Windows Server template for the SQL Servers before I made a domain controller. I don’t know why I did that, but I wouldn’t do it that way again. I’ll give you the instructions in a better order.
Please note that domain names (example.com), subdomain names (lab), and IP addresses shown in this article are examples. Some identifying details have been changed, but the configuration and procedures remain the same.
Building the Domain Controller
Open virt-manager on Linux Mint.
Create a new Windows Server 2025 virtual machine using the Windows Server evaluation ISO.
- Left click the File menu at the top.
- Left Click “New Virtual Machine”
- You will now see a series of radio buttons with “Local install media(ISO image or CDROM)” already selected.
- Click the “Forward” button at the bottom right.
- Click the “Browse” dropdown menu and navigate to the directory where you have the Windows Server ISO stored.
- The name of the OS will pre-populate for you for Windows.
- Click the Forward button again.
- Choose how much RAM and how many CPUs to give the OS and click “Forward.”
- Select the proper backing storage. In my case, that means select the radio button for “select or create custom storage” and locating the directory /data/VMs
- Choose a name for the machine, in my case DC01. Remember, this is just the label for the machine in Virt Manager.
- On this screen where you create a label for the machine in Virt Manager, left click the right pointing arrow next to “Network Selection” and in the drop down menu, select the option for SQLLab and click Finish."
Install Windows Server 2025. You will step through the installation process for Windows.
Complete the initial Windows configuration.
Installing Active Directory Services
I used the GUI in Windows Server Manager under Manage > Add Roles and Features to do this part. That wizard starts with a “Before you begin” page that provides some pre-requisites. Follow those and click next. That brings the wizard to the “Select installation type” page where the radio button next to “Role-based or feature-based installation” is already selected. Click Next. On the next screen the DC01 machine name will be preselected. Click next. In the “Select server roles” dialog, place a check in the boxes next to Active Directory Domain Services and DNS Server. Then click next. Step through those wizards.
When I was prompted in the Active Directory wizard for a root domain name, I had to do some research because I wasn’t sure what to enter. At some point Microsoft had provided the guidance to just use .local for a domain. That guidance has now changed and since I owned a domain already, I chose a sub-domain of my primary domain based on the information on the following links.
building-an-active-directory-home-lab
Microsoft: Install Active Directory Domain Services Using Server Manager
choose-the-right-dns-active-directory-domain-name
Also, I had a long conversation with ChatGPT about this topic to try to help me make a decision about the root domain and the sub-domain name to use. Put some thought into the domain and sub-domain when creating your own lab. Toward the end of this AD setup I was prompted with default values for “Paths” and I accepted the defaults.
Toward the end of this process, I promoted DC01 to a domain controller. That’s actually a separate step from installing the Active Directory Domain Services role. Because DC01 was the first domain controller in my environment, I selected the Add a new forest option in the Domain Controller Promotion Wizard.
The reproducible Server Manager sequence is:
- Open the notification flag in Server Manager on DC01 after installing AD DS.
- Select Promote this server to a domain controller.
- Choose Add a new forest.
- Enter lab.example.com as the root domain.
- Configure the domain controller options, including DNS and the Directory Services Restore Mode password.
- Confirm the NetBIOS name is what you intend.
- Review the AD DS database, log, and SYSVOL paths.
- Run the prerequisite checks and install.
- Allow the server to restart after promotion.
I then assigned an available IP address for DC01 and left the Preferred DNS value to 127.0.0.1, which is just the local computer.
I then clicked on the “Install” button and the wizard completed. The machine rebooted on its own.
Once the machine was back up ChatGpt asked me to verify the config by running these two commands in PowerShell.
Get-ADDomain

Resolve-DnsName dc01.lab.example.com
Resolve-DnsName asks the configured DNS resolver to resolve that hostname to DC01’s address, which it did.
Building the Active Directory and DNS machine was now complete.
Cloning the Windows Server 2025 Template to make SQL01 and SQL02
I needed a directory to host each VM. For SQL01 I ran the following at the command line. I could have just as easily made the new directory manually in Linux Mint’s version of Windows File Explorer, which is called Nemo.
mkdir /vmdata/VMs/SQL01
Then I cloned the template for the SQL Server machine.
virt-clone \
    --original Winserver2025 \
    --name SQL01 \
    --file /vmdata/VMs/SQL01/WinServer-OS.qcow2 \
    --file /vmdata/VMs/SQL01/WinServer-SQLData.qcow2 \
    --file /vmdata/VMs/SQL01/WinServer-SQLLogs.qcow2 \
    --file /vmdata/VMs/SQL01/WinServer-SQLRecovery.qcow2 \
    --file /vmdata/VMs/SQL01/WinServer-Tempdb.qcow2
What those options mean:
- –original Winserver2025 — specifies the existing VM we’re cloning. It remains unchanged.
- –name SQL01 — names the new libvirt VM SQL01.
- Each –file supplies the destination for one cloned writable disk. virt-clone associates them with the source disks in their existing order.
- The command is deliberately specifying five –file arguments because the master has five writable QCOW2 disks.
Starting up and configuring the new server
I then started SQL01 from virt-manager. Because this is the first boot of the generalized clone, Windows entered the Out-Of-Box Experience (OOBE). I went through the Windows Server OOBE prompts. As part of this, I accepted the licensing terms and set the built-in Administrator password.
Once on the desktop of the new server I used the following PowerShell supplied from ChatGpt to rename the computer inside Windows. Keep in mind that the name given to a computer in Virt-Manager is just a label and has no connection to the true computer name inside the OS.
Rename-Computer -NewName "SQL01" -Restart
Once the machine rebooted, I could check in Server Manager to confirm the new computer name or run the below PowerShell.
hostname
Spice Guest Tools Installation
For some unknown reason, I ran into some issues with Spice Guest Tools where it either wasn’t present or the Spice Guest Agent service wasn’t there. As a result, I had to reinstall Spice Guest Tools on a couple of the machines. As a reminder from part 1, this utility is similar in function to VMware Tools on VM guests. The main functionality I was looking for was being able to execute copy/paste from my Linux Mint host to the VM guest.
Network Configuration and Domain Join
Next, from a command prompt on my Linux Mint machine, I verified what network the new SQL01 was using from the perspective of Virt-Manager. You may remember from the part 1 post that I created a separate network called SQLLab. The below command shows me what network this new SQL01 is using to talk to Virt-Manager.
virsh domiflist SQL01
domiflist means domain interface list:
- dom = the libvirt domain/VM name.
- if = network interface.
- list = display the interfaces.
- SQL01 = the “domain” we’re examining, which is the VM SQL01.
Here is what that command returned for me. The important column was the Source value. SQL01 was using the default virt-manager network and not SQLLab.
| Interface | Type | Source | Model | MAC |
|---|---|---|---|---|
| vnet0 | network | default | e1000e | xx:xx:xx:xx:xx:xx |
I shut down the OS and in Virt manager I followed these steps.
- Right clicked the SQL01 VM name and selected “open”.
- From the top menu I left clicked View and then selected details.
- Then I selected the NIC option along the left hand side.
- This brought me to the Details tab for “Virtual Network Interface.”
- From there I clicked the drop down menu next to Network Source and chose the SQLLab network and then clicked “Apply” in the lower right.
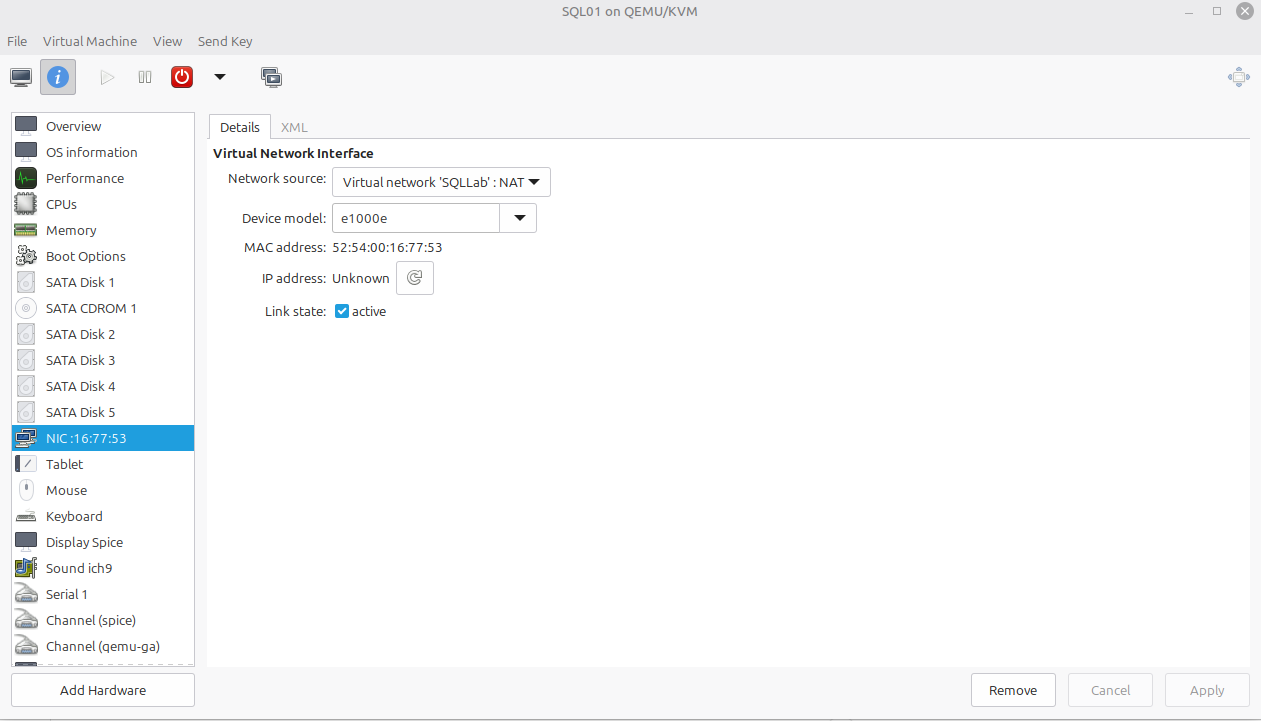
I powered on the SQL01 machine and then ran this command again in the terminal “virsh domiflist SQL01” from the Linux Mint host to confirm what Virt-Manager recorded as the network that SQL01 was using. This time it returned “SQLLab” as expected.
I then returned the Network Adapter information from my Windows machine using PowerShell. Next, I set the IP Address and Default Gateway values.
Get-NetAdapter


New-NetIPAddress `
    -InterfaceAlias "Ethernet" `
    -IPAddress 192.168.50.21 `
    -PrefixLength 24 `
    -DefaultGateway 192.168.50.1


Get-NetIPAddress -InterfaceAlias "Ethernet" -AddressFamily IPv4 |
    Select-Object IPAddress, PrefixLength, PrefixOrigin, AddressState
That last command I ran a couple of times and the AddressState value switched to “preferred”, which is what it needed to be.
I then set the DNS Server on SQL01 to be the IP address of the DC01 machine.
Set-DnsClientServerAddress `
    -InterfaceAlias "Ethernet" `
    -ServerAddresses 192.168.50.10
On SQL01 I ran the below to make sure it could resolve properly and return the IP address of DC01.
Resolve-DnsName dc01.lab.example.com
The next step was to join the machine to the domain I had created earlier.
Add-Computer -DomainName "lab.example.com" -Credential "lab\Administrator" -Restart
Based on code provided by ChatGPT, I enabled the built-in Windows Firewall rules that allow ping.
Enable-NetFirewallRule -DisplayGroup "File and Printer Sharing"

Enable-NetFirewallRule -Name "FPS-ICMP4-ERQ-In"
I then repeated this process to make the SQL02 machine and assigned it an IP of 192.168.50.22.
Creating a jumpbox
I didn’t want to work directly on either SQL01 or SQL02 because, again, I wanted this lab to be production-like. In prod at a business, you wouldn’t be opening an RDP session to the SQL Server to launch SSMS and do work. You wouldn’t do that, right?!
So, I manually created another machine the same way I did with DC01 and named it Utility. Here is a list of what I installed on Utility.
- DBATools
- SSMS 22
- Probably Spice Guest Tools installation again to be sure it was working as expected
I had noticed that Get-Help would sometimes tell me the help was limited. So, I also ran update-help in PowerShell to retrieve a complete set of help pages.
Creating an administrative model
SQL01, SQL02, and Utility were joined to lab.example.com. DC01 remained in the Domain Controllers OU while the member servers were moved to:
OU=Servers,DC=lab,DC=example,DC=com
To avoid using the Administrator/Domain Admin account, I worked with ChatGPT to create a new account that would be a local admin on the machines. The ai model walked me through creating a Group Policy, a new account and new security group that the new account was placed in, and applying the Group Policy to Utility, SQL01, and SQL02.
lab\NewAccountName
 ↓
lab\Server Admins (New Security Group)
 ↓
Local Administrators
on SQL01, SQL02, and Utility
GPO
- GPO name: Member Server Administrators
- Computer Configuration
- Preferences
- Control Panel Settings
- Local Users and Groups
- Action: Update
- Group: Administrators (built-in)
- Member: lab\Server Admins
This provided administrative rights on member servers without making the normal account a Domain Admin.
Conclusion
This process brought me to a natural stopping point. I had a Domain Controller, two machines where I would install SQL Server, and a jumpbox from which I would administer the environment. In part 3, I’ll walk through the automated SQL Server installation process via PowerShell, and possibly the Windows Cluster set up. Those two components would form the foundation for the Availability Group.