
3 Ways to Restore SQL Server Databases
This is likely the last in a series of three posts about backups and restores. My aim with this series has been to give you an idea of the options available and a basic start on using those options. I’m not trying to go in-depth on the subject of backups and restores.
Today will be about getting you going on the concept of restoring databases in SQL Server. I’m using a local install of SQL Server 2017 on my desktop PC to demonstrate these techniques.
Obtaining the StackOverflow Database
Before I dive into demonstrating the restore options, I want to talk a little bit about the set up. I’m using the StackOverflow2010 database. Anonymized data dumps of the StackOverflow database are available here. This particular version of the database I’m using came from a page on Brent Ozar’s site.
I then used the below PowerShell code to take backups. Between the Full and Diff backup I added one user to the Users table. Between the Diff and Log backup I add two more users.
backup-dbadatabase -SqlInstance MySQLServer2017InstanceName -Database 'StackOverflow2010' -Path 'C:\Program Files\Microsoft SQL Server\MSSQL14.KRONOS2017\MSSQL\Backup\StackOverflow2010' -Type Full -FilePath dbname-backuptype-timestamp.bak -ReplaceInName -CompressBackup -Verify

backup-dbadatabase -SqlInstance MySQLServer2017InstanceName -Database 'StackOverflow2010' -Path 'C:\Program Files\Microsoft SQL Server\MSSQL14.KRONOS2017\MSSQL\Backup\StackOverflow2010\' -Type DIFF -FilePath dbname-backuptype-timestamp.bak -ReplaceInName -CompressBackup -Verify

backup-dbadatabase -SqlInstance MySQLServer2017InstanceName -Database 'StackOverflow2010' -Path 'C:\Program Files\Microsoft SQL Server\MSSQL14.KRONOS2017\MSSQL\Backup\StackOverflow2010' -Type Log -FilePath dbname-backuptype-timestamp.trn -ReplaceInName -CompressBackup -Verify
Below is the T-SQL I used to insert some rows. That value for Age though! Ah, to be 25 again!
INSERT INTO dbo.Users ([AboutMe], [Age], [CreationDate], [DisplayName], [DownVotes], [EmailHash], [LastAccessDate], [Location], [Reputation], [UpVotes], [Views], [WebsiteUrl], [AccountId])
VALUES
('I make SQL Server more stable, highly available and easier to manage', 25, GETDATE()-7, 'Lee Markum', 0, NULL, GETDATE(), 'Saint Louis, MO', 0, 1000000, 2000000, 'LeeMarkum.com', NULL)

--Took a differential backup here so I would have some changes to restore

INSERT INTO dbo.Users ([AboutMe], [Age], [CreationDate], [DisplayName], [DownVotes], [EmailHash], [LastAccessDate], [Location], [Reputation], [UpVotes], [Views], [WebsiteUrl], [AccountId])
VALUES
('I make T-SQL solutions that just work', 25, GETDATE()-7, 'T-SQLGuru', 0, NULL, GETDATE(), 'Saint Louis, MO', 0, 1000000, 2000000, NULL, NULL),
('I make SSIS solutions that just work', 25, GETDATE()-7, 'SSISGuru', 0, NULL, GETDATE(), 'Saint Louis, MO', 0, 1000000, 2000000, NULL, NULL)

--Took a log backup here
Using SSMS to Restore a Database
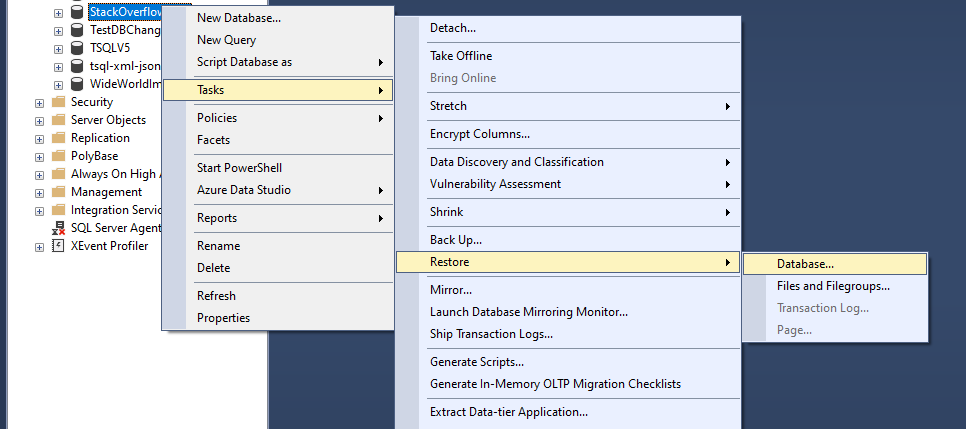
Just like for creating a backup, SQL Server Management Studio has menu options for restoring a database. Open your copy of SQL Server Management Studio and connect to a non-production or lab environment of some kind. You’re going to right click the database you want to restore and use the fly out menu to navigate to Tasks > Restore > Database.
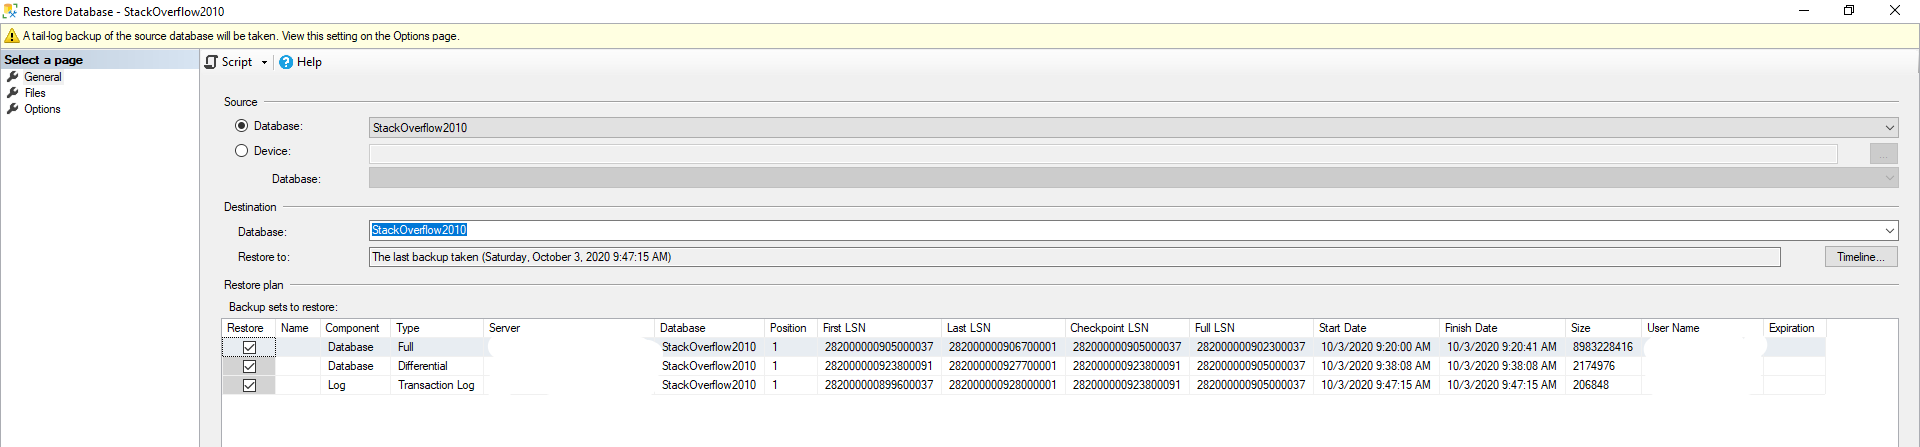
Selecting the Database option from the fly-out menu above brings you to the below page. Notice in the following screen that SQL Server finds the applicable backup files for you. No in-depth knowledge of restore operations is needed in this case because the work is done for you. It has found the full, differential and log backups that I took earlier. Each row represents a backup file.
If you only want to restore to the time represented by the differential backup, then uncheck the box next to the log backup. SQL Server will then restore the full and differential backup, but not the log backup. You might want to do something like this if you know that the data in the database was corrupted or changed in an unexpected or undesired way immediately after the differential backup. As a result, you restore the database to the point in time represented by the differential in order to restore the database to its last known good condition.
In the Destination section, SSMS fills in the name of the database that you selected earlier for restoring. However, if you give the database a different name here, then you can restore the database and compare the restored database to the current database. You might want to do this in order to attempt to repair data in the current database by getting data from the restore ddatabase. Please note the yellow banner that informs you that this process will take a tail log backup. This is a preventative measure. It captures the last portion of the transaction log called the tail of the log. It allows for complete recovery. Without this backup, if you restore this database, you could lose transactions.
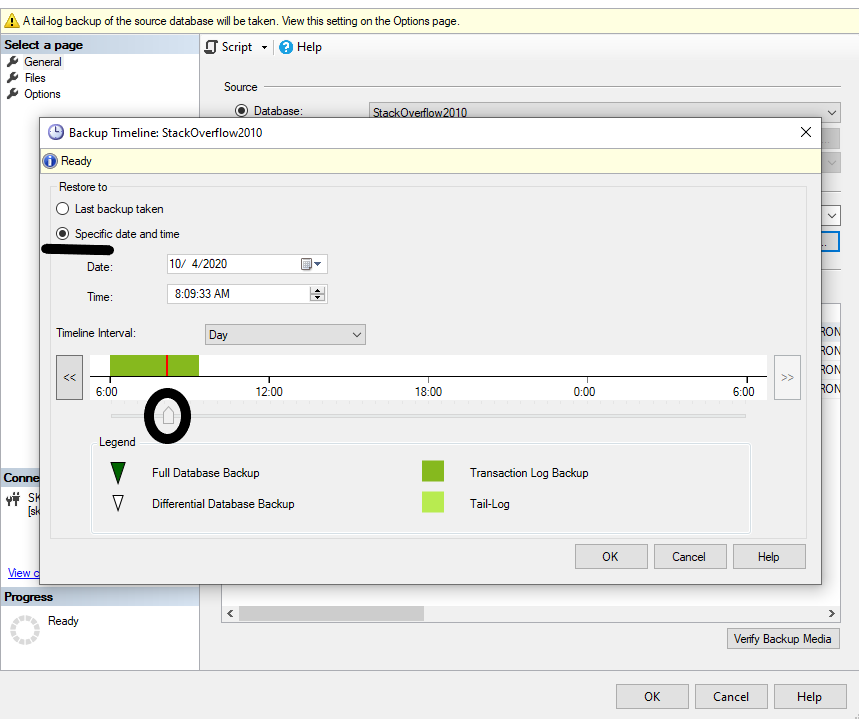
One other option I want to point out on this screen is what the “Timeline” button is for. When clicked, you’ll arrive at a screen like the below. This allows you to choose a point in time to restore to based on the available backups. This point in time restore is only available for databases in the full and bulk-logged recovery model. For bulk-logged recovery model, certain rules apply as to when this option would be available.
If you select the radio button next to “Specific date and time” then you can either specify a certain date and time in the Date and Time boxes or you can also use the slider icon along the bottom. There is also a Time Interval drop down that controls what you see in the colored timeline above the slider icon. Using this option is the same as using the WITH STOPAT command using T-SQL for the restore. For my demo, I have not used this option, but I want you to be aware that it is available. This Timeline feature is new in SQL Server 2012.
Once you have the General page looking the way you need it, click on the Files selection on the left to bring you to the page below. Here you have one option to work with and that is whether you want to relocate the database files to another folder. Checking this option allows you not only to relocate the files, but rename them as well. You might want to do that if you’re restoring the database to a different name so that you don’t have two databases with different names, but the same file names. That might make it more difficult later to figure out which files belong to which database without running a query to figure it out.

Should You Use the WITH REPLACE Option?
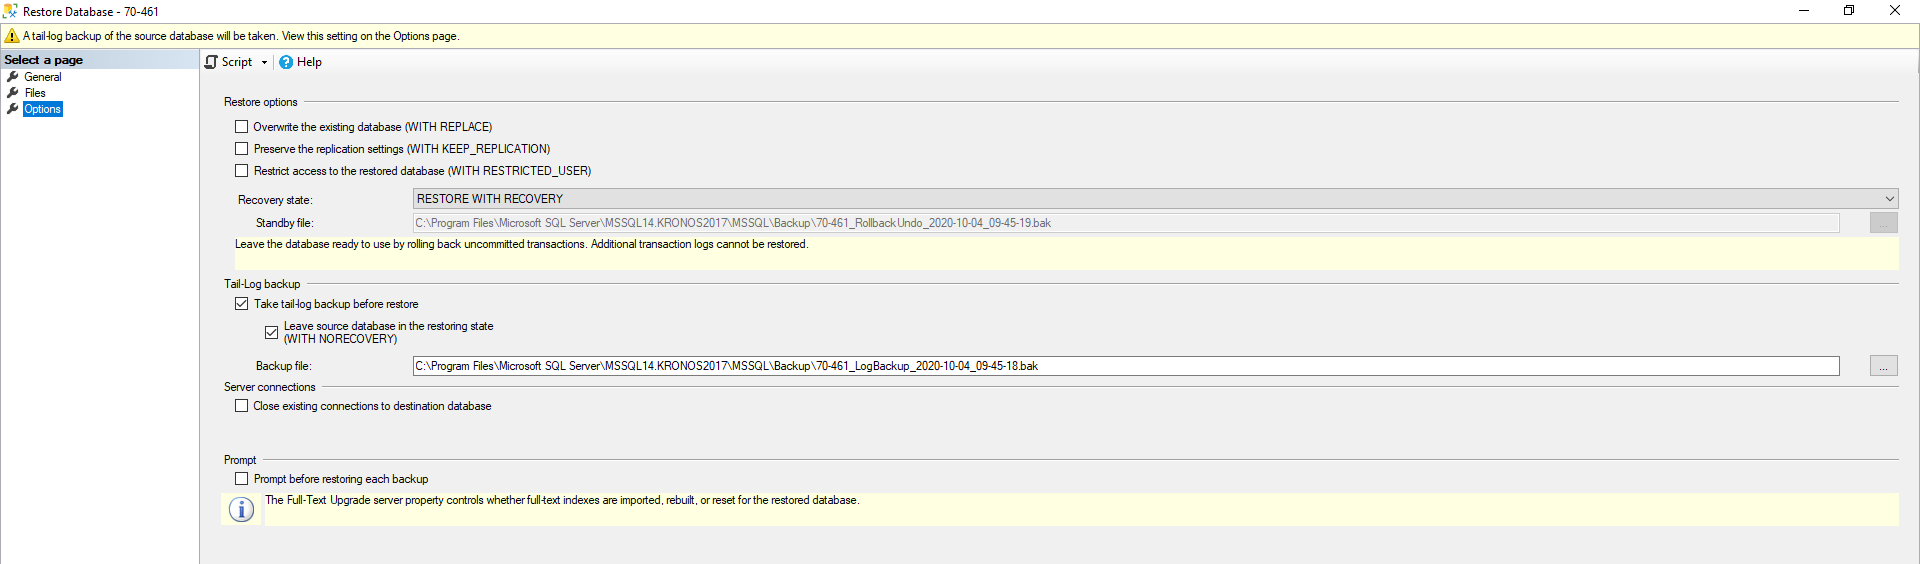
Now click on the Options selection on the left. You arrive at the below page. The option “overwrite the existing database (WITH REPLACE)” will bypass certain checks that would normally occur during the restore process. As a result, you really would rarely use this option, if ever. This option will do what it sounds like and replace the target database with the database in the backup file. If you mistakenly point this restore to database on a different server that isn’t the same database that is in the backup and use this WITH REPLACE option, then you will overwrite the other database on the other server. There is a large section in this page about caution using the WITH REPLACE option.
Here is where the option for taking the Tail-log backup is located. You should leave this checked and note the location for where that backup will be written. If it isn’t the location you would like, change it in the Backup file box.
There is also an important option under “Server connections.” If you leave this unchecked and there are current connections to the database then the restore will fail. A restore operation needs exclusive access to the database in order to perform a restore so other connections must be terminated first. When this option is selected, SSMS will take care of that for you.
Once all the options you want are filled in, I would encourage you to click the Script option at the top so you can obtain the T-SQL equivalent for what SSMS is going to do. You can either click OK in the lower right of SSMS to execute the restore, or click Cancel and go to the T-SQL to review what will be done and then execute the T-SQL.
Now let’s turn our attention to using T-SQL for restoring a database.
Using T-SQL to Restore a Database
Below is the generated T-SQL for restoring the StackOverflow2010 database based on the available backup chain on my local SQL Server. I have added comments so you can better understand what each part is doing. T-SQL syntax for performing a restore is, in most scenarios, not too difficult. I am not showing things like file and filegroup restores or piecemeal restores. These are more advanced scenarios.
USE [master]
/*This is the first part of the T-SQL generated when the "close existing connections" option is chosen in the GUI. This gives the session doing the restore the exclusive access needed.
*/
ALTER DATABASE [StackOverflow2010] SET SINGLE_USER WITH ROLLBACK IMMEDIATE

--This is the tail-log backup
BACKUP LOG [StackOverflow2010] TO  DISK = N'C:\Program Files\Microsoft SQL Server\MSSQL14.KRONOS2017\MSSQL\Backup\StackOverflow2010_LogBackup_2020-10-04_10-23-33.bak' WITH NOFORMAT, NOINIT,  NAME = N'StackOverflow2010_LogBackup_2020-10-04_10-23-33', NOSKIP, NOREWIND, NOUNLOAD,  NORECOVERY ,  STATS = 5

/*Here is the full backup.  Database restores need a place to start from and the full backup is that place.
*/
RESTORE DATABASE [StackOverflow2010] FROM  DISK = N'C:\Program Files\Microsoft SQL Server\MSSQL14.KRONOS2017\MSSQL\Backup\StackOverflow2010\StackOverflow2010-Full-202010030919.bak' WITH  FILE = 1,  NORECOVERY,  NOUNLOAD,  STATS = 5

--Here is the differential backup
RESTORE DATABASE [StackOverflow2010] FROM  DISK = N'C:\Program Files\Microsoft SQL Server\MSSQL14.KRONOS2017\MSSQL\Backup\StackOverflow2010\StackOverflow2010-Differential-202010030938.bak' WITH  FILE = 1,  NORECOVERY,  NOUNLOAD,  STATS = 5

--Her are the two log backups to restore
RESTORE LOG [StackOverflow2010] FROM  DISK = N'C:\Program Files\Microsoft SQL Server\MSSQL14.KRONOS2017\MSSQL\Backup\StackOverflow2010\StackOverflow2010-Log-202010030947.trn' WITH  FILE = 1,  NORECOVERY,  NOUNLOAD,  STATS = 5
RESTORE LOG [StackOverflow2010] FROM  DISK = N'C:\Program Files\Microsoft SQL Server\MSSQL14.KRONOS2017\MSSQL\Backup\StackOverflow2010_LogBackup_2020-10-04_09-20-23.bak' WITH  FILE = 1,  NOUNLOAD,  STATS = 5

/*This is the second part of the T-SQL generated when the "close existing connections" option is chosen in the GUI. This puts the database back to multi_user so it is ready to be used*/
ALTER DATABASE [StackOverflow2010] SET MULTI_USER

GO
Now let’s take a look at doing this with PowerShell
Using PowerShell to Restore a SQL Server Database
There are commands in the PowerShell on your local PC or server that will perform restores of SQL Server backups. However, we will be discussing the PowerShell module called DBATools, which has to be installed before it can be used.
Please go to https://dbatools.io/download/ to see how to obtain and set up the module for use with this part of the blog post. I won’t be covering that here as the material is well documented on their site.
Once you have that, open PowerShell as an Administrator. Type in the below code and hit F5.
Help Restore-dbadatabase -Detailed
This will give you a full description of the parameters and switches available in this command. Numerous example code snippets will also be shown. From that help information I wrote the two examples that follow. The first example will not perform the restore but instead writes to a .sql all the T-SQL needed to perform the command. Strictly speaking, the -DatabaseName and value aren’t needed because the only backup files in that directory are for the StackOverflow2010 database. This option is useful so you can see what the command is going to do.
In the second example, the PowerShell will actually do the restore and then write it’s actions out to a text file. This is useful for having a history of what the command did.
In the third example, this will use the folder structure from Ola Hallengren’s world famous maintenance solution. Notice the following switch:
-MaintenanceSolutionBackup
There are also switches for maxtransfersize, buffercount, and blocksize. These can all be experimented with for your databases to find an optimal combination that restores the database as fast as possible. Additionally, there is a -RestoreTime option that is the equivalent of the WITH STOPAT syntax in T-SQL and the TimeLine function in the SSMS GUI.
<#This will not perform the restore, but will instead create a .sql file of the necessary T-SQL to do the requested restore.
#>
Restore-DbaDatabase -SqlInstance MYPC\Kronos2017 -DatabaseName StackOverflow2010 -Path 'C:\Program Files\Microsoft SQL Server\MSSQL14.KRONOS2017\MSSQL\Backup\StackOverflow2010' -WithReplace -OutputScriptOnly | Out-File 'C:\DBAToolsRestoreScripts\RestoreStackOverFlow2010.sql'

<#This will do the restore and create a text file showing what the PowerShell command actually did
#>
Restore-DbaDatabase -SqlInstance MYPC\Kronos2017 -DatabaseName StackOverflow2010 -Path 'C:\Program Files\Microsoft SQL Server\MSSQL14.KRONOS2017\MSSQL\Backup\StackOverflow2010' -WithReplace | Out-File 'C:\DBAToolsRestoreScripts\RestoreActionsStackOverFlow2010.txt'

<# This will do the restore based on Ola Hallengren's directory structure from his world famous maintenance solution.  Notice the switch -MaintenanceSolutionBackup
#>
Restore-DbaDatabase -SqlInstance MYPC\Kronos2017 -Path 'C:\Program Files\Microsoft SQL Server\MSSQL14.KRONOS2017\MSSQL\Backup\StackOverflow2010' -MaintenanceSolutionBackup -WithReplace -OutputScriptOnly | Out-File 'C:\DBAToolsRestoreScripts\RestoreStackOverFlow2010.sql'
Next Steps to Take
- Download and install DBATools. It’s useful for a lot more than handling SQL Server restore scenarios!
- If you’re not familiar with PowerShell, you need to learn it, if for no other reason than the options that DBATools provides you for working with SQL Server.
- Connect to a test server and try out each method. Get some experience with these methods so you know which one you like the most and so you’re not trying to figure out how you want to perform a restore when you actually have to do it for real.
- If you would like help with anything in this post, or with something else related to SQL Server, reach out to me here, or on Twitter, and I’ll be glad to offer assistance.